
Note: A comprehensive brief builds trust with your manufacturing partner. It ensures your custom design for the fixture matches your vision.
A clear design helps your manufacturing partner produce perfect custom displays. The final displays and fixtures will reflect your exact custom design for the fixture and custom displays. This process helps you brief a manufacturer with total clarity.
How to Brief a Manufacturer: Core Requirements
Before your manufacturing partner can start on your custom design, you must provide core project details. A clear brief at this stage prevents misunderstandings and sets your custom display project up for success. You need to brief a manufacturer with foundational information to get an accurate quote for your custom displays.
Define Project Scope and Purpose
First, you need to explain what the project is. Your manufacturing partner needs to understand the purpose of your custom displays. Will they be used in a busy retail environment or for a special event? A clear scope helps your supplier understand your vision for the custom fixture.
Tip: A strong project scope includes key details. This helps your manufacturing partner deliver high-quality displays that meet your expectations.
Your scope should outline:
Project Goals: What will the custom displays accomplish?
Key Resources: What materials and tools are needed for the design?
General Timeline: What are the critical milestones for the project?
Specify Exact Dimensions and Tolerances
You must provide exact measurements for your custom design. This includes the height, width, and depth of the fixture. You also need to specify tolerances, which are the acceptable variations in dimensions. Different materials have different standard tolerances.
Material & Thickness | Typical Tolerance |
|---|---|
Mild Steel (6mm / 0.25″) | ±0.10 mm (±0.004″) |
Aluminum (3mm / 0.12″) | ±0.10 mm (±0.004″) |
Acrylic (3mm / 0.12″) | ±0.15 mm (±0.006″) |
Plywood (6mm / 0.25″) | ±0.25 mm (±0.010″) |
Tighter tolerances require more precision, which increases costs and production time. Be clear about what level of quality and precision your custom design requires. This detail is vital for your retail displays.
State Required Quantity and Future Orders
Tell your supplier how many custom fixtures you need. The quantity directly impacts the price per display. Larger orders often result in a lower per-unit cost because fixed costs are spread across more items. Your manufacturing partner can also get better material prices from their supplier for larger quantities.
When you brief a manufacturer, also mention any potential future orders. If you plan a multi-store retail rollout, sharing this information helps your partner provide better pricing and plan for long-term production. Discussing your future needs and customization options helps build a strong partnership and ensures consistent quality for all your custom displays. This information is crucial for any retail fixture.
Design Specifications for Custom Displays
Clear design specifications are the blueprint for your custom displays. You must provide visual and technical details to your manufacturer. This ensures the final fixture matches your vision and meets quality standards for the retail environment. A good design brief transforms your ideas into a tangible product for effective merchandising.
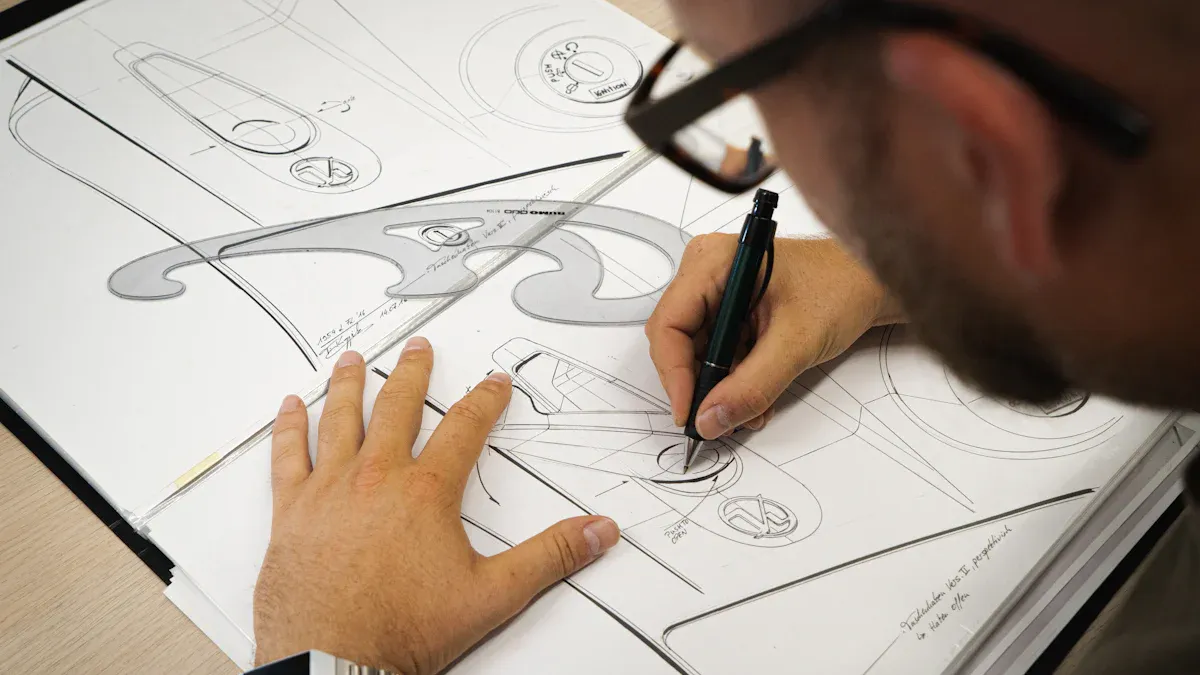
Submit Technical Drawings and CAD Files
You need to provide detailed technical files for your custom displays. Reputable manufacturers expect professional engineering drawings. These drawings should have the clarity of a Bill of Materials (BOM). A BOM is a comprehensive list of all materials, parts, and components needed to build your custom fixture. A proper BOM helps your manufacturer understand every detail of the display design.
Note: A detailed BOM prevents errors in production. It lists every component, from the main panels down to the smallest screws, ensuring high-quality construction.
Your BOM should include specific information for each part:
Full part name and material specifications
Surface finish, gloss level, and color codes (Pantone / RAL)
How parts are joined together
Quantity of each unit
Packaging instructions and compliance needs (e.g., UL plug)
For the 3D design, you should submit files in a standard CAD format. Most manufacturers accept universal formats that work across different software.
STEP (.stp): This is an excellent choice for 3D models. It is a widely recognized ISO standard that preserves the solid geometry of your design.
IGES (.igs): This is an older but still very common format. It works with nearly all CAD systems and is great for sharing surface models.
SLDPRT (.sldprt): If your manufacturer uses SOLIDWORKS, this native file format is also a good option, especially for sheet metal parts.
Providing these files ensures your manufacturer can accurately produce your custom design.
Specify Branding and Graphics
Your visual branding must be consistent across all merchandising displays. You need to give your manufacturer precise instructions for colors and graphics. This step is critical for creating effective visual merchandising solutions.
For colors, you must provide specific codes instead of general names like "blue." The two main systems are Pantone and RAL.
Feature | Pantone (PMS) System | |
|---|---|---|
Primary Use | Graphic design, printing, and branding | |
Industry Focus | Global standard in design and fashion | |
Color Range | Focused palette ideal for industrial applications | Extensive palette with metallics and special effects |
You should use RAL for coated or painted physical products. Use Pantone when you need to match colors for printed graphics and brand identity materials. Providing the correct code ensures the final color of your custom displays is perfect.
You also need to specify how to apply graphics. Common printing methods for custom displays include:
Silk Screen Printing: This method pushes ink through a stencil. It creates vibrant, durable graphics and is cost-effective for large orders.
Digital Printing: A printer applies the design directly to the surface. This technique is great for high-resolution images and complex, colorful visual designs.
Clear instructions for logo placement, size, and printing method will guarantee your branding looks sharp and professional on the final point-of-purchase displays. This attention to detail enhances the overall quality of your visual merchandising.
Detail Finishes and Assembly Needs
The finish and assembly of your custom displays impact their look, durability, and cost. You must clearly define these requirements in your brief to ensure the final quality meets your expectations for the retail environment.
The surface finish protects the fixture and contributes to its aesthetic. For metal fixtures, you have several customization options:
Powder Coating: An environmentally friendly option that creates a durable, high-quality finish resistant to chipping and fading.
Anodizing: An electrochemical process, often used on aluminum, that creates a hard, corrosion-resistant layer. It can also add color.
Electroplating: This process adds a thin metal layer (like chrome or nickel) to enhance appearance and durability.
Brushed or Polished: These are mechanical finishes that create a specific texture, from a matte, linear look to a smooth, reflective shine.
Finally, you must decide how you want to receive your custom displays. You can choose between knock-down or fully assembled delivery.
Knock-Down (KD): These displays are shipped flat and require assembly on-site. This can lower shipping costs but requires time and labor to build. The quality might be lower due to simpler joinery.
Fully Assembled: These displays arrive ready to install. They are generally stronger and have a higher-quality finish. This option saves you assembly time and ensures professional construction, which is ideal for complex retail displays or custom pop displays.
Your choice depends on your budget, timeline, and the complexity of the display design. Clearly stating your preference helps the manufacturer plan for production and shipping, ensuring your merchandising fixtures arrive as expected.
Material Specs for a Custom Acrylic Display
Choosing the right materials is essential for the success of your custom acrylic display. Your material choices affect the look, durability, and cost of your custom fixtures. A clear brief on materials ensures your manufacturer creates high-quality displays that enhance your visual merchandising. This is a key part of your overall merchandising design.
Select Primary and Secondary Materials
You first need to select the primary material for your custom acrylic display. The two main types of acrylic are cast and extruded. Your choice depends on your design needs and budget. Cast acrylic offers higher optical quality and durability, making it great for luxury custom displays. Extruded acrylic is more cost-effective for large orders of custom displays.
Cast Acrylic | Extruded Acrylic | |
|---|---|---|
Clarity | Higher optical clarity | Moderate clarity |
Cost | Higher | Lower |
Machining | Better edge quality | Can melt during cutting |
Durability | More impact resistant | Less resistant |
You can also combine acrylic with secondary materials like wood or metal. This adds a unique visual element to your custom design and merchandising fixtures.
Detail Hardware and Integrated Tech
You should specify any hardware your custom acrylic display needs. If you need a secure acrylic display case, you must detail the locking mechanism.
Mechanical Locks: These include flat key and tube key locks for basic security.
Electronic Locks: These offer higher security and can use keypads or fobs.
If your design includes lighting, you must provide technical details. LED lighting for custom displays operates on safe, low-voltage DC power (12V or 24V). Ensure the power supply is UL certified to meet safety standards. This detail is vital for a quality fixture and effective visual merchandising.
Outline Structural and Durability Needs
The durability of your custom acrylic display depends on its structural design. You must specify the acrylic thickness needed to support the products on display. The right thickness ensures your custom displays remain stable in a busy retail environment. A thicker acrylic provides better quality and strength for your merchandising displays.
Tip: Use this table as a guide for your custom design. Heavier products require a thicker acrylic for better support and a higher quality visual presentation.
Width Range | Panel Thickness | |
|---|---|---|
Standard Floor Displays | Up to 30" | 6mm |
Large Floor Displays | 30-36" | 8mm |
High-Load Applications | Varies | 8-10mm |
Clearly outlining these needs helps your manufacturer build a durable and beautiful fixture for your retail space. This ensures your visual merchandising is both safe and effective.
Logistics and Partnership Details
You must align on logistics to ensure a smooth partnership. Clear communication about prototypes, shipping, and budget helps your manufacturing partner deliver your custom displays successfully. This final step in how you brief a manufacturer solidifies your project plan.
Define Prototype and Approval Process
You should always request a prototype before full production. This first-article sample is a critical step to test your design and quality. Developing a custom fixture prototype can take several weeks, but it saves money by catching issues early. Ask your supplier for a sample of your custom design for approval.
You also need to understand the supplier's quality control (QC) process. A good manufacturing partner will have a visual QC system to ensure the quality of your custom displays. Their process should include:
Initial Material Inspection: Checking all raw materials meet your design specifications.
In-Process Monitoring: Visually inspecting the custom displays during production.
Final Assessment: A comprehensive check of the finished retail displays against your drawings.
This ensures every one of your custom displays meets the highest quality standards.
Clarify Packaging and Shipping
Your custom displays need to arrive safely. You must provide clear instructions for packaging to prevent damage during transit. For delicate materials like acrylic, specify the use of non-abrasive wraps like polyethylene foam.
Tip: Avoid direct contact between bubble wrap and acrylic surfaces. It can leave imprints or cause fine scratches on your beautiful custom displays.
Work with your retail display supplier to define the best packaging for your fixtures. This includes using sturdy boxes, proper void fill, and clear "Fragile" labels. Proper packaging protects the quality of your retail displays and ensures they arrive ready for use.
Communicate Target Budget and Timeline
You should communicate your target budget and timeline early. Sharing a budget range allows your supplier to treat cost as a core part of the design process. This approach, known as Design-to-Cost, helps your manufacturing partner propose creative solutions that fit your financial goals. It helps them find the right balance between quality and cost for your custom display project.
Providing a clear timeline helps the supplier manage their production schedule. It ensures they can deliver your custom fixtures on time. This transparency builds a strong partnership and helps you get the best possible custom displays for your retail needs.
A detailed brief is your blueprint for success. It aligns your vision with your manufacturing partner. When you brief a manufacturer with a complete design, you ensure your custom displays are produced with quality. This process builds trust with your supplier and leads to high-quality custom displays. Use this framework to strengthen your partnership with your supplier and manufacturing partner. A great brief helps your manufacturing partner deliver quality fixtures and excellent custom displays. This leads to better outcomes for your custom design and all custom displays. Your supplier can then meet quality targets for all custom displays, ensuring your design vision for the custom fixtures and custom displays is realized. The quality of your design and displays will improve.
FAQ
Why is a budget range better than a fixed price?
You should provide a budget range. It allows your manufacturer to suggest creative, cost-effective solutions. This flexibility helps them balance quality and cost. They can design better displays within your financial goals.
What if I don't have professional CAD files?
You can still proceed with your project. Many manufacturers have in-house design teams. They can turn your sketches or concepts into professional engineering drawings for your custom displays. Just provide as much detail as possible.
Is a prototype always necessary for custom displays?
Yes, you should almost always request a prototype. 💡 A sample lets you test the design, materials, and overall quality before full production. This step prevents costly mistakes and ensures the final product meets your expectations.
How do I choose the right material for my displays?
You should consider the product's weight and the store environment. For example, high-traffic areas need durable materials. Your manufacturer can recommend the best options based on your design needs and budget.
